Mengapa Vektor?
Once upon a time, people had to use pen and paper to compose letters or write articles. Sekali waktu, orang harus menggunakan pena dan kertas untuk menulis surat atau menulis artikel. College papers were drafted on stacks of notebook paper; lots of lines crossed out unwanted words or sentences, while little carets inserted additional words or phrases. makalah College disusun pada tumpukan kertas notebook; banyak garis mencoret kata-kata atau kalimat yang tidak diinginkan, sedangkan carets sedikit disisipkan kata-kata tambahan atau frase. It wasn't unusual to see garbage cans full of crumpled pieces of paper (this was also before recycling), or for writers to mark pages with arrows or footnotes that pointed to other places where they wanted to insert another paragraph or two. Itu tidak biasa untuk melihat tong sampah penuh dengan potongan kertas kusut (ini juga sebelum daur ulang), atau bagi para penulis untuk menandai halaman dengan panah atau catatan kaki yang menunjuk ke tempat-tempat lain di mana mereka ingin memasukkan satu atau dua paragraf.In contrast, I am writing this article while sitting in front of a screen, my fingers on a keyboard. Sebaliknya, saya menulis artikel ini sambil duduk di depan layar, jari-jari saya di keyboard. If I decide I don't like something, I move my hand over to the mouse, highlight the offending text, and with a simple click of a button, delete it. Jika aku memutuskan aku tidak menyukai sesuatu, saya menggerakkan tangan saya ke mouse, sorot teks menyinggung, dan dengan mudah klik tombol, menghapusnya. As I read over what I've written, I decide a clarifying remark would be in order, so I move my cursor up and type in my new thought. Ketika saya membaca lebih dari apa yang telah ditulis, aku memutuskan ucapan klarifikasi akan guna, jadi aku memindahkan kursor ke atas dan ketik pikiran baru saya.
Learning how to create and use vector graphics is as powerful as learning how to use a word-processing program. Belajar bagaimana membuat dan menggunakan grafis vektor adalah sebagai kuat seperti belajar bagaimana menggunakan program pengolah kata.
What Are Vector Graphics? Apakah Grafik Vektor?
Most images that you see on a Website are raster graphics -- images made up of little dots (pixels) of color. Sebagian besar gambar yang Anda lihat di Website adalah grafis raster - gambar terdiri dari titik-titik kecil (piksel) warna. If you were to take a gif or jpeg and zoom in, you'd see the individual pixels that make up the graphic: Jika Anda adalah untuk mengambil gif atau jpeg dan zoom in, Anda akan melihat individu piksel yang membentuk grafis: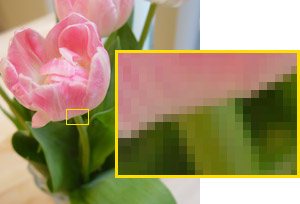
If you use an imaging program to shrink the graphic, it makes some calculations that "average" neighboring pixels together to create an image with smaller dimensions. Jika Anda menggunakan program pencitraan untuk mengecilkan grafis, itu membuat beberapa perhitungan yang "rata-rata" piksel tetangga sama untuk membuat gambar dengan dimensi yang lebih kecil. But if you wanted to enlarge the graphic, the imaging program would take the existing pixels, perform some calculations, and add in lots of extra pixels to make the image larger. Tetapi jika Anda ingin memperbesar, grafis program pencitraan akan mengambil piksel yang ada, melakukan beberapa perhitungan, dan menambahkan dalam banyak piksel ekstra untuk membuat gambar yang lebih besar. This usually results in a blurry picture. Ini biasanya menghasilkan gambar buram. In the diagram below, you can see our original 100x102 pixel image, enlarged 300%. Dalam diagram di bawah ini, Anda dapat melihat gambar asli kami 100x102 pixel, diperbesar 300%. Raster images do not enlarge well! gambar Raster tidak memperbesar baik!

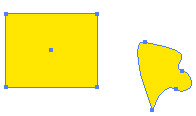
Time to contrast raster graphics with vector graphics : Vector graphics are made up of points that define lines and curves. Waktu untuk kontras grafis raster dengan grafis vektor: vektor grafis yang terdiri dari titik-titik yang menentukan garis dan kurva. For example, the rectangle below is a vector graphic made up of four points connected by lines, and the abstract shape is made up of points connected by curved lines. Misalnya, kotak di bawah ini adalah vektor grafis terdiri dari empat poin dihubungkan oleh garis, dan bentuk abstrak terdiri dari titik dihubungkan dengan garis lengkung. The graphics hold information about the direction of the line or curve, how thick the line is, and what color or pattern fills the shape. Grafis menyimpan informasi tentang arah dari garis atau kurva, seberapa tebal garis adalah, dan apa warna atau pola mengisi bentuk.
Another good thing about vector graphics is that their file size is usually smaller. Satu hal baik tentang grafis vektor adalah bahwa ukuran file mereka biasanya lebih kecil. Raster graphics have to store information about each pixel. Raster grafis harus menyimpan informasi tentang masing-masing pixel. Vector graphics only have to store information about the points. Vector grafis hanya perlu menyimpan informasi tentang poin.
By now, you should be pretty excited about vector graphics. Sekarang, Anda harus sangat bersemangat tentang grafis vektor. Let's start to make them! Mari kita mulai untuk membuat mereka!
Basic Shapes Bentuk Dasar
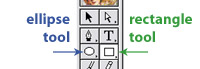
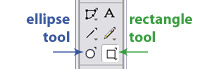
Adobe Illustrator and Macromedia Freehand have many basic shape tools that make it easy to create rectangles, circles, and other shapes. Adobe Illustrator dan Macromedia Freehand memiliki alat banyak bentuk dasar yang membuatnya mudah untuk membuat persegi panjang, lingkaran, dan bentuk lainnya. Let's take a quick tour of the Tools palettes (palettes may vary slightly depending on what version of the program you have): Mari kita tur singkat dari palet Tools (palet mungkin sedikit berbeda tergantung pada apa versi program yang Anda miliki):Both Illustrator and Freehand display the Ellipse and Rectangle Tools by default: Baik Illustrator dan Freehand layar dan Persegi Panjang Tools Ellipse secara default:
Illustrator: Ilustrator:
Freehand: Freehand:
In Illustrator, hold down the ellipse and rectangle buttons to view more tools for other types of shapes -- polygons, spirals, and rounded rectangles. Di Illustrator, tahan tombol elips dan persegi panjang untuk melihat alat yang lebih untuk jenis lain bentuk - poligon, spiral, dan persegi panjang bulat.
Illustrator tools: Ilustrator alat:
Freehand has an additional Polygon tool under the Rectangle Tool option, as well as the Arc Tool and Spiral Tool, accessible from the Xtra Tools Palette (Window > Toolbars > Xtra Tools). Freehand memiliki alat Polygon tambahan di bawah opsi Rectangle Tool, serta Tool Arc dan Spiral Tool, diakses dari Xtra Tools Palette (Window> Toolbar> Xtra Tools). To create rounded rectangles or star shapes, you can modify some of the options of the tools or objects (more about this later). Untuk membuat persegi panjang bulat atau bentuk bintang, Anda dapat memodifikasi beberapa pilihan alat atau benda (lebih lanjut tentang ini nanti).
Freehand tools: Freehand tool:
Drawing a shape using one of these shape tools is really, really easy. Menggambar bentuk menggunakan salah satu bentuk alat ini sangat, sangat mudah.
- Select the tool. Pilih alat.
- Click in the document, hold, and drag. Klik di dalam dokumen, tahan, dan tarik.
- Release the mouse button when the shape is as big as you want it to be. Lepaskan tombol mouse ketika bentuknya sebesar yang Anda inginkan. You're done! Anda selesai!
Default draws from corner Default menarik dari sudut
Holding alt or option key draws from center. Holding alt atau option kunci menarik dari pusat.
Changing Options or Properties of Basic Shapes Mengubah Pilihan atau Properti Shapes Dasar
Illustrator : When using the shape tools in Illustrator, you may select the tool and then simply click once on the page (don't hold and drag) to pull up the options dialog box for that shape. Ilustrator: Bila menggunakan alat bentuk di Illustrator, Anda dapat memilih alat ini dan kemudian cukup klik sekali pada halaman (jangan pegang dan tarik) untuk menarik kotak dialog pilihan untuk bentuk itu. The options dialog box allows you to define specific dimensions for a shape (for example, a precise 2x3-inch rectangle, or a 200x200-pixel circle) and, for some shapes, to provide additional options. Kotak dialog pilihan memungkinkan Anda untuk menentukan dimensi spesifik untuk suatu bentuk (misalnya, kotak 2x3 inci tepat, atau lingkaran 200x200-pixel) dan, untuk beberapa bentuk, untuk memberikan opsi tambahan. For example, the Rounded Rectangle Tool option box allows you to specify the radius for the rounded corners: Misalnya, kotak Rounded Rectangle Tool pilihan memungkinkan Anda untuk menentukan jari-jari untuk sudut dibulatkan:
Similarly, the Polygon (and Star) Tools have options that allow you to define the number of sides (or points) the shape will have: Demikian pula, Polygon (dan Star) Peralatan memiliki pilihan yang memungkinkan Anda untuk menentukan jumlah sisi (atau poin) bentuk akan memiliki:
After you define the options, click "OK" to create a shape with those specifications. Setelah Anda menentukan pilihan, klik "OK" untuk membuat bentuk dengan spesifikasi tersebut. The shape tool will remember the options for other shapes that you create with that tool. Bentuk tool akan mengingat pilihan untuk bentuk-bentuk lain yang Anda buat dengan alat yang. To change them, simply click once to bring up the options dialog box again. Untuk mengubah mereka, cukup klik sekali untuk membuka kotak dialog pilihan lagi.
Freehand : Freehand's shape options can be accessed by double-clicking on the tool button itself, which, in the case of the Rectangle Tool, allows you to specify a corner radius to create a rounded rectangle: Freehand: bentuk pilihan's Freehand dapat diakses dengan mengklik dua kali pada tombol alat itu sendiri, yang dalam kasus Rectangle Tool, memungkinkan Anda untuk menentukan sudut radius untuk menciptakan sebuah persegi panjang bulat:

Double-click the polygon tool, and you'll be able to specify the number of sides -- whether the shape is a polygon or a star -- and even the angles of the star points. Klik dua kali tool poligon, dan Anda akan dapat menentukan jumlah sisi - apakah bentuknya poligon atau bintang - dan bahkan sudut dari titik-titik bintang.
After you create a shape in Freehand, you can further refine its dimensions and properties by selecting the shape and changing the numbers and options in the Properties > Object palette. Setelah Anda membuat bentuk di Freehand, Anda dapat lebih menyempurnakan dimensi dan properti dengan memilih bentuk dan mengubah angka dan pilihan dalam palet> Properties Obyek.
If exact dimensions don't matter to you, but you want to enlarge or shrink an object in Illustrator or Freehand, switch to the black arrow tool (known as "Selection Tool" in Illustrator, "Pointer Tool" in Freehand, and "black arrow" for us low-tech types), then select the object, and finally drag on the corner handles to get the object to your ideal size. Jika dimensi yang tepat tidak penting bagi Anda, tetapi Anda ingin memperbesar atau mengecilkan objek di Illustrator atau Freehand, beralih ke alat panah hitam (dikenal sebagai "Selection Tool" di Illustrator, "Pointer Tool" di Freehand, dan "hitam arrow "bagi kita jenis teknologi rendah), kemudian pilih objek, dan akhirnya tarik di sudut pegangan untuk mendapatkan objek ke ukuran ideal Anda.
Tidak ada komentar:
Posting Komentar